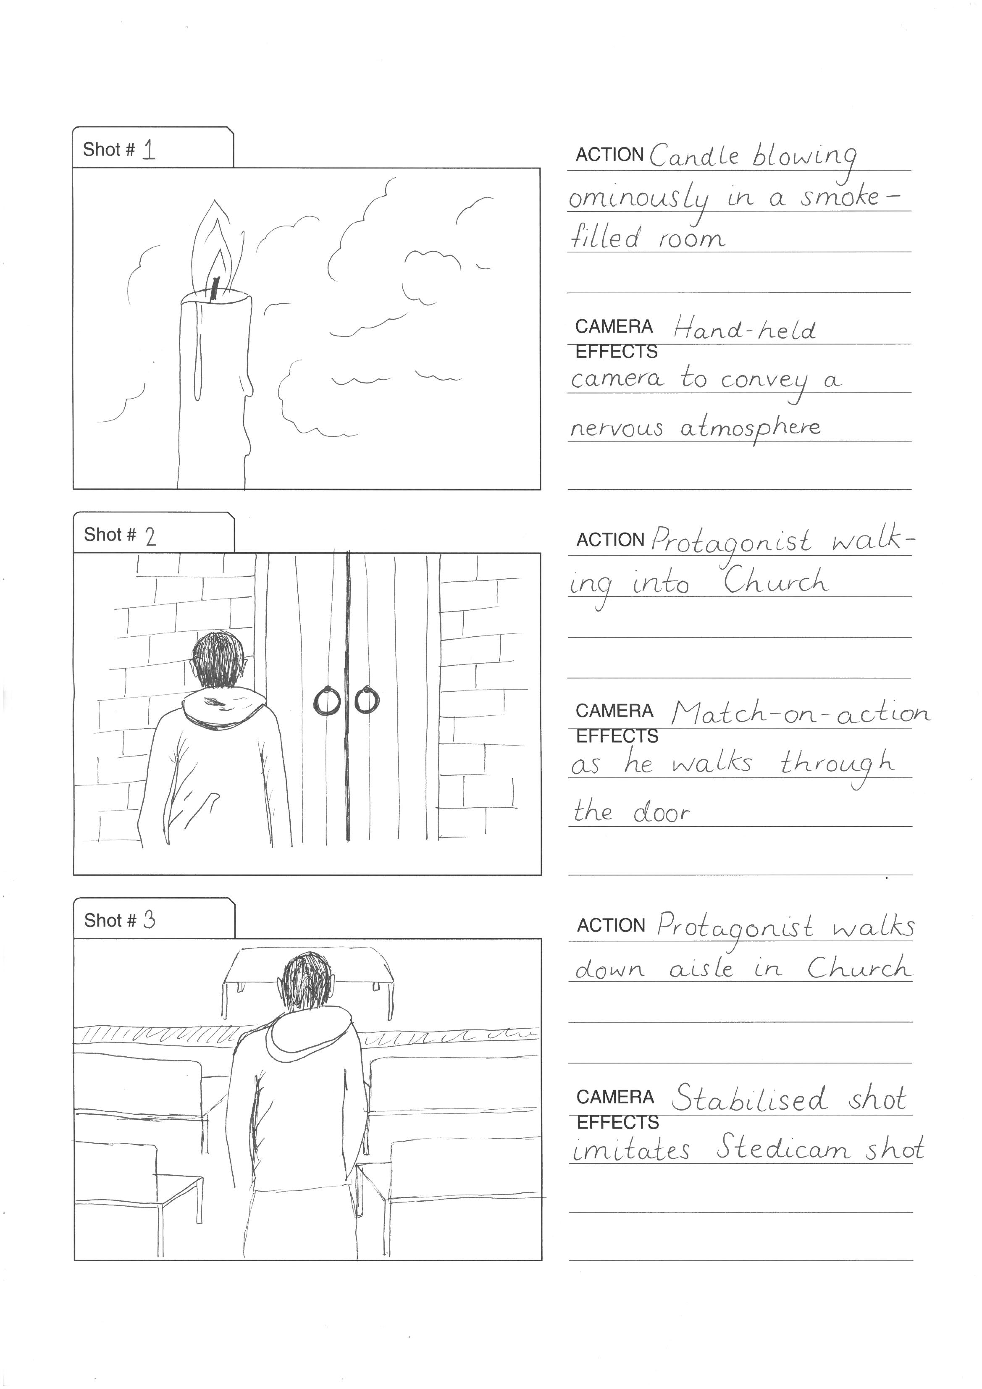
Before creating our preliminary task, I decided to draw out a basic storyboard with sketches and notes to mark out our shots, ensure we include a match-on-action shot, dialogue, the 180 degree rule and a shot-reverse-shot.
Before starting our final film opening, we decided that we wanted to create a brief storyboard of our plot and camera framing.
I made a template using a computer and hand drew a series of images that we wanted to replicate in our film opening. I also listed the actions and camera techniques used alongside the drawings.
- subverts the stereotype of the main victim being female
- of a young adult age range
- more experienced acting skills
Actor 2:
- conforms to the convention of the main victim being a young female
- would allow us to experiment with innocent, natural-looking makeup as opposed to heavy makeup
- of a young adult age range which would appeal to our target audience
Actor 3:
- again, conforms to the stereotype of the main protagonist being a female
- feminine features and long hair
- developed acting skills
Actor 4
- subverts stereotypical feminine victim
- of a young adult age range
- limited acting skills
Conclusion
In conclusion, we as a group decided that actor 1 was going to be our actor of choice. The fact that he is a member of our group means that he will have a similar creative vision to us when acting and portraying his role. Although actor 2 was also a member of our group, we liked the fact that actor 1 subverted the stereotypical gender roles often displayed in horror.
Before we had finalised a location, we drew a list of possible Churches we could film in. We chose Churches that were local to our school, so all members of our group would be able to visit them easily.
I began by phoning the number of Church. If they seemed interested, I asked for their email address and sent them an email following this format:
Dear Mr/Mrs
I spoke to you earlier regarding a group of four of us using your grounds and interiors for a few hours to film a scene for our A Level media project.
The filming would last approximately 1-2 hours, and would involve us talking a few shots of the general interior of the Church - the stained glass, the decor etc.
We aim to film at some point across the next week, however we are fully flexible as to exact timings - we would be extremely grateful for your help!
The filming has been approved by our teachers from Townley Grammar School.
Thank you so much for your cooperation. We look forward to hearing back from you.
Kind regards,
Anna
Three of the Churches I phoned either didn't answer or were unable to allow us permission due to the vicar not being present. The fourth was happy to let us film, but was only available during hours in which we had school.
Eventually, we came across a small Church near our school. We went in and verbally asked for permission as we had our camera equipment on us due to filming a few test shots prior to finding the Church. Our request was granted and we filmed there and then, spending a few hours perfecting shots and angles.
The aesthetic of our final location was actually the best we had seen, due to the fact that that particular Church was Catholic, which means it had more vibrant decoration than the other Protestant Churches.
Before starting our typography, we made a draft list of all the credits. To find out an appropriate order for the credits we watched a few film openings to record how the credits are shown. The list runs as follows:
A Twisted Pictures Production
Directed by...
Produced by...
Edited by...
Screenplay by...
Casting by...
Costuming and Make Up by...
Director of Photography -
Music by...
The Typography
We wanted to use typography that was clear, attractive and professional.
Eventually we settled on this style - it is simple and clear. We wanted to avoid cliche horror fonts with blood drops and special effects, as we wanted a more understated font to gently compliment the visuals on screen.
The Animation
We wanted our text to have a flickering effect. Initially, we did not know how to get such an effect, so we researched on the internet to see if there were any online applications to download animated text. After an unsuccessful search, we decided to create the font manually. To do this, we created multiple layers of the text and resized each one, flipping some of them upside-down or at an angle. Once we had created this multi-layered text we simply spliced each of them to be visible for only a short time (a fraction of a second). When viewed in normal speed, this gives the effect of flickering.
After filming the entirety of our footage, we began to edit our sequence following our storyboard. We arranged the sequence starting with the cellar scenes, with the Church scenes featuring as flashbacks.
However, we began to notice that the narrative was unclear, as we struggled to highlight how the Church scenes are in fact merely visions. To solve this, we played around with moving the Church scenes to the very start of the sequence. This gave a completely different feel to the piece, yet didn't help much with the narrative clarity.
We then decided to try again with using the Church scenes as visions appearing later on in the sequence, using different techniques to clarify the nature of the scene. One method we used was using a blurring transition between scenes of reality and flashback. Although this increased the clarity, the transitions themselves looked unprofessional and amateur. We agreed on the fact that cleaner, simpler transitions are of a better aesthetic standard.
Finalising our arrangement is an ongoing process, and one which will require much thought from our team.
While editing our horror film, we decided that we needed to settle on a film production company to show at the beginning of our film opening. One that immediately sprung to mind was Twisted Pictures, which is an American independent production label.
Upon further research, we learned that the production company was initiated in 2004, with their most famous project being the Saw series.
Twisted Pictures appear to take in a large revenue. As shown in their filmography below, on some of their more popular films they have made a huge profit. For example, the film Saw saw a 8,591% return on their million-dollar investment. Hopefully this provides evidence that Twisted Pictures would be a suitable candidate in terms of handling and promoting a horror film.
Twisted Pictures also produced two horror games based on Saw, which shows that the company are interested in horizontal integration.
Why would we potentially want to use Twisted Pictures as our production company of choice?
It is an independent label - due the to the fact that we have a low budget, an independent company would best assist us and meet our needs
It focuses on the horror genre
It places a focus on unique horror narratives, which would be suitable for our religion-based horror
To organise our day efficiently, we stuck to the filming schedule as rigidly as possible. This allowed us to ensure we fit a substantial amount of work in a day's filming.
Objectives We Overcame:
The candles we used to light the cellar ran out after around 45 minutes - we had to replace these frequently, carefully ensuring we placed them in the same places.
The ceiling on the staircase to the cellar was extremely low - we had to carry objects to the landing one by one which was fairly time consuming.
Overall, our filming day was successful and we managed to film everything we had planned to. As it stands we should not have to re-film any of the scenes involving SFX makeup, which is good to reduce the likelihood of continuity errors.
Fortunately, my next door neighbour offered to lend us their cellar for our project. Shown below are some photographs I took of it when I went to visit.
The Main Cellar Room
This location is perfect for our chosen genre - it is dark, eerie, and decrepit. It is a fairly small area, approximately 5x5m, however it is just large enough to fit us and our equipment. The only issue with this location is the contents of the cellar, however as a group we will be able to shift the pots to the ground floor while we film.
The Cellar
The Stairway
The stairway is again eerie and dark, however it quite a confined space. It would be good for an establishing shot to let the audience know that the room is underground.
The stairway
Although it is difficult to make out, the image below shows the descending staircase into the basement. As you can see, the ceiling descends too meaning that we will have to be careful carrying tall camera equipment.
The descending stairs
Pros of Using the Cellar as a Location
No natural light - the changing outdoor light will not affect us, so we can easily keep our lighting consistent
Dark and dingy - conforms to horror genre
No noises or disturbances - our video will not be interrupted
Toilet facilities on the ground floor
Next door to my house - we can take breaks filming and can travel easily to the location
The location is safe to visit
Cons of Using the Cellar as a Location
It may get cramped with all four members of our team present
It may be difficult to illuminate
Unloading and reloading the cellar will be time consuming
Overall, it is likely that we will use this as our location as we are all happy with its aesthetic, and are confident that we could get some really effective shots from it.
As a group we decided that it would be wise to create a filming schedule to try and organise our time efficiently.
As our film opening will include fairly complex aspects of stage makeup, we need to ensure that we aim to film all of our scenes involving the stage makeup on one day, to avoid any inconsistencies within the míse en scene.
The day we have chosen to start filming is 28/12/16. We decided that we would use this day to film all our scenes involving the protagonist and the stage makeup. The other scenes (the contents of the protagonist's flashbacks), for example the shots of the Church, will be filmed on a different day.
The filming schedule for the 28/12/16 is as follows:
0900: Meet at location (my house)
0915: Gather and organise míse en scene items
0925: Carry all the míse en scene items to our location (the building conveniently next door)
0945: Clear out the cellar, moving all the paint pots and other items to the landing on the ground floor 1130: Carry down all our míse en scene items; the chair, stool, books and candles 1145: Gather the two pieces of scrap wood and using hemp cord, bind them together to form a cross 1200: Apply blood to the cross in the areas of crucifixion 1215: Arrange the items of míse en scene appropriately 1230: Trial different lighting techniques to sample which looks best on camera 1245: LUNCHBREAK 1330: Begin filming all the scenes that don't involve stage makeup 1445: Apply SFX makeup 1545: Film the rest of the scenes involving the SFX makeup 1700: Remove SFX makeup and place the paint pots back into the cellar 1900: finish
It is inevitable that minor inconveniences will happen, and we have accounted for this in our schedule. However it is possible that we will continue our filming day beyond 7pm.
A family friend of mine happens to be an artist and kindly offered to lend us their art studio to film our project. Before we finalise our idea, I decided to visit the studio and take a number of photographs showcasing the decor of the studio.
The Entrance
The studio is situated in a Victorian edifice, so the walls are tarnished and the ceiling plasterwork is ornate and decorative. This gives an eerie feel to the building, and if used with a low key lighting set up could be very effective. However, one issue with this area of the building is the blue doorframe - these perhaps ruin the antique aesthetic to the hall. It may be better to use a quick shot of the dilapidated walls rather than a lengthy scene in the hallway.
A shot of the building's entrance from the staircase
A high-expoure shot from the front doorway
The Studio
The studio is cluttered and busy - however there are a number of interesting props we could use. The aesthetic of the studio could be effective in a more arty piece, however for our genre of choice it would probably not be particularly effective.
The mantlepiece
The Studio
The parts of interest I picked out included:
The victorian mantlepiece - this could be cleared and used
The rustic mirror leaning against the wall on the mantlepiece
The antique painting hanging on the wall above the mantlepiece
Hallway #2
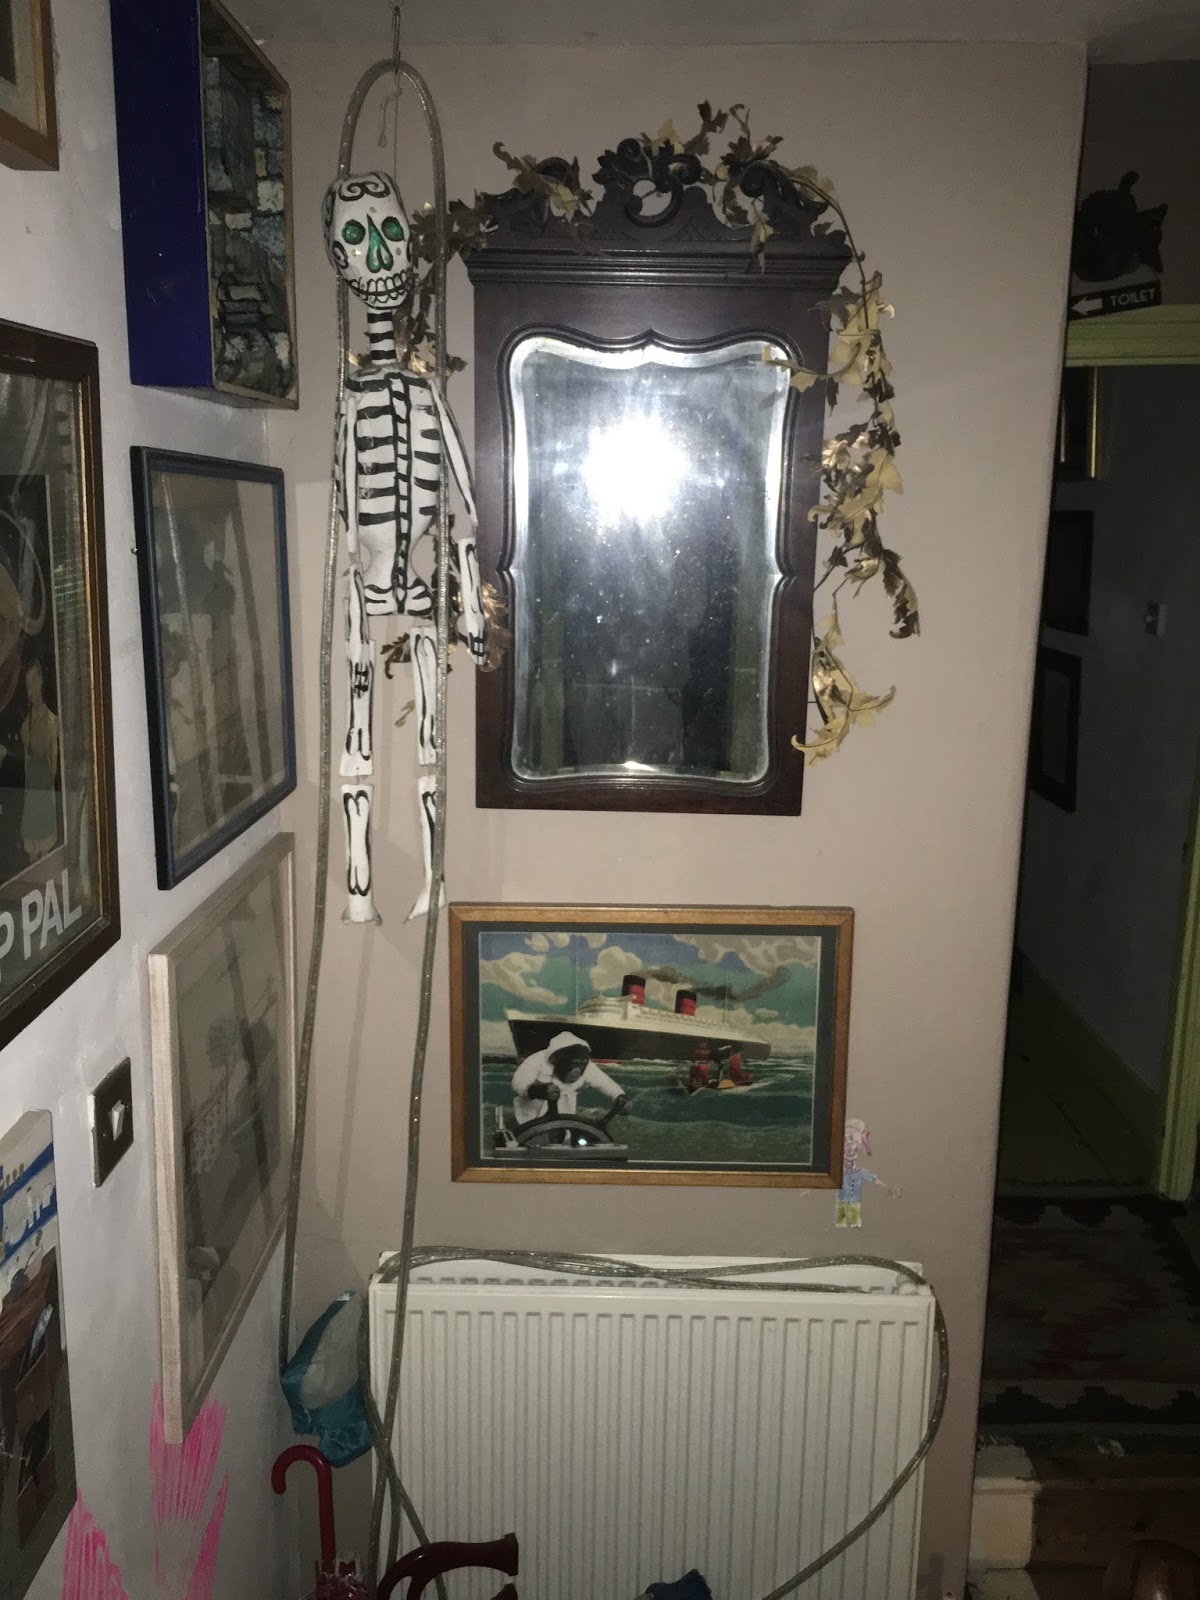
The second hallway has an interesting wooden mirror with ivy on it - this could potentially be used to film a shot from the reflection of the mirror. The style of the mirror and paintings emphasises the rustic aesthetic that typically is associated with the horror genre.
Hallway #2
The Mural
Although the mural is an interesting aspect of the art studio, its lively aesthetic is unlikely to do us any favours in terms of filming a horror opening.
The Spare Bedroom
The spare bedroom features a large mirror, which again could be used for an interestingly angled shot. I also am keen on the lampshade, which is very rustic. With a low key lighting set up, I think that the furniture in this room could really have an eerie feel to it, as the paintings on the walls and the ubiquitous patina have a very captivating aesthetic. This style of decor is commonly associated with the horror genre, so fits well with the codes and conventions of horror.
Overall, I think we could definitely take some interesting shots from this building, however it is unlikely we will use it as our main focal location. We could also borrow some of the interesting props and transport them to an alternative location.
When shooting scenes for our film opening, we want to maximise the effectiveness of each and every shot. The rule of thirds is a theory divised to ensure that each shot is appealing to the eye, as well as keeping its symmetry and balance. The rule of thirds applies both within photography and film.
An image composed with the rule of thirds
The theory is based on scientific research that the human eye automatically and subconsciously gravitates to an insertion point when an image is split into thirds. The theory also states that the main focus and interest of the shot should be situation in the first and second thirds of the shot. The focus of the image can be placed on the right or left hand side, however it must remain within only the two thirds. This is demonstrated in the image above, with the building located within the right hand two-thirds.
How can we apply this to our horror film opening sequence?
When shooting over-the-shoulder shots we should ensure to keep the in-focus character within the allocated two thirds.
When shooting long-shots of architectural exteriors, we should ensure to keep the building aligned correctly within the thirds.
As part of our location scouting, we visited a small community church in our local borough. Shown in the video below are a collection of photographs we took to document some interesting aspects of mise-en-scene we could use within our film opening.
Some general research on the building let us to note that is a listed building due its traditional style and decorations. An old Church rather than a newly built one would be much more effective to film, due to its character and charm.
Pros of this location:
stained glass window could make a very effective shot
the Church is an old building (grade II listed)
the interior of the Church has a variety of religious artworks
the building is situation close to home, so filming on several days wouldn't be an issue
there is an outside space to film the exterior of the building
the building has bathroom facilities which would be helpful for a long filming day
Cons of this location:
getting permission for entry to the building with cameras may be a significant issue
the Church may not allow us to film shots of the exterior of the building
Overall, we decided that it would be unlikely we could gain permission to enter the building to film (however we will politely ask anyway). However, a few montage shots of the exterior of the building could be extremely powerful within our opening, for example shots of the stained glass windows or the wooden doors opening or closing. The general architectural structure of the Church could also feature within our opening, for example a short shot of the spire or brickwork.
In a horror film opening sequence, the selected typography plays a large role in establishing the creative direction of the film. The feature of on-screen text often includes the opening credits; the names and titles of the production crew.
Within film trailers, the logo and branded typography features as the film title is shown at the end of the trailer. However, since we are creating a film opening rather than a trailer we will not be including the film 'logo' in the actual sequence.
Analysis of Horror Typography
Colour
When I searched 'horror+film+poster' in google images, a variety of posters appeared. As shown in the screen capture below, the majority of the film titles are written in a red text.
Typography
Selection of popular horror titles
As shown above, many font schemes used within horror titles have a similar aesthetic. The lines are often ragged, with little to no straight lines. The fonts all have a handwritten quality to them, looking as though they could have been scrawled by hand.
Other common features of typography within horror include:
'drips' of liquid coming from the letters - looks like dripping blood
There has always been a ubiquitous link between religion and horror, stemming from many fictional pieces of Gothic Literature. The horror genre essentially introduces the viewer to their underlying fears and questions related to religion and spirituality, particularly as a result of the spiritual enlightenment in 18th Century Europe.
However, the relationship between religious and horror is frequently ambiguous - and this is particularly prominent in the fact that very few horror films explicitly tackle religious narratives or issues.
The codes and conventions of horror films often include symbols - these can be used for an eerie effect, and to give subliminal messages to the viewer. Popular symbols are often stemmed from medieval rituals and religions, as these are items that are regarded as mysterious and somewhat fascinating.
Many films include religious symbolism of some kind - more than we might imagine. Some might use more subliminal links to Biblical Tales, however some may explicitly use religious symbols.
Religious Allegories within the Horror Genre
One example of a film that uses a biblical allegory rather than explicit symbols could include The Truman Show, which is perhaps representative of the spiritual journey of the soul. The various images of light falling from the sky mimics the religious idea of light falling from heaven. Furthermore, the part where Truman has to cross a vast sea to reach the 'promise land' is similar to the story of Moses.
In our own opening sequence we could reference particular Biblical stories. Due to the fact that we live in a predominantly Christian society, these features would be fairly recognisable.
Religious Symbols within the Horror Genre
The Cross
The Cross is a religious symbol belonging to Christianity or Catholicism. It is used religiously to represent the crucifixion of Jesus Christ, however in horror films it can be used as a force against evil.
This symbol works well within supernatural horror films as it ties in with themes of exorcism and religious healing. The symbol of the cross is frequently turned upside down as a symbol of religious or spiritual unrest within a family or household, for example within The Conjuring 2 in the scene where the cross on the walls rotate upside down before falling off the walls.
Using the symbol of a cross in this way in our own horror sequence would be fairly easy to do, as the mise en scene required is fairly easily accessible.
The cross can also be used as a symbol of death, as it is commonly associated with gravestones and cemeteries. These types of locations are frequently used throughout the horror genre (especially Gothic horror) as the fear of death amongst the audience is artfully played upon. During our location scouting process we will consider locations like this as they often have a very eerie effect on the overall mise en scene of the sequence, whilst conforming to the common conventions of horror.
A Typically Eerie Cemetery
Stigmata
Stigmata is the term used to describe wounds or sensations of pain on the body that inhabit similar locations to the crucifixion wounds of Jesus Christ. The most common forms of stigmata occur on the hands, wrists and feet.
As a group, we discussed the topic of stigmata, and upon conversation we decided that we didn't have an equal understanding of how stigmata appears, and what it symbolises or means. To answer our queries, I did some further research and collated and summarised it below:
General Points to Note
Stigmata is thought to be a 'mystical grace given by God'
There sometimes appears an injury on the chest to represent Jesus' heart wound from the lance of the Roman soldiers
There has been reported cases of a shoulder wound, from where Jesus carried the cross
Injuries from a crown of thorns can also occur
The injuries can appear individually or simultaneously
Stigmata can be invisible, where one simply feels pain or discomfort in those areas
In many reported cases of stigmata, a floral scent is released with the blood
90% of reported cases of stigmata have occurred within women
Where are the wounds situated?
Hands or wrists (there has been some dispute as to whether the hands can actually support one's weight, so some believe Jesus was nailed through the wrists)
Forehead
Chest
Shoulders
Feet
What is the purpose of the wounds?
Some argue that the wounds are placed to unite one with Jesus
Before starting to plan and film our project, our group decided that it would be best to research different camera angles and movement and how each of them is used for effect. We will research the overall effect each camera angle gives, and how we can use them to our advantage within our project.
Camera Angles
Aerial Shot
Usually taken from a helicopter
Used at the beginning of films to establish the setting
We will not be able to use this shot, as we will not have access to any of the equipment required.
Bird's Eye View Shot
Sets the scene and can be used to show the overall setting of the film
Very unnatural angle
Familiar objects such as umbrellas may look entirely unrecognisable from this angle.
Puts the audience in a god-like position where people in shot can appear very small and insignificant
In our horror film opening we could use a bird's eye shot to establish the setting in the first few seconds of the sequence. However, bird's eye view shots are very difficult to execute without specialist equipment, so it may be impossible for us to include on in our sequence as helicopters or drones are not readily available to us.
High Angle Shot
Not as extreme as the bird’s eye view
The camera is elevated above the action using a crane to give a general overview
High angles make the object photographed seem smaller and less significant
We could use this camera angle in our film opening to frame a victim from above, as though they are being watched from a villain above. This also is an uncomfortable viewing angle, so we could use it to add to the uneasiness. If we had a scene where the victim was unaware, a high angle shot will make the viewer feel external to the scene, building the tension.
Eye Level
Probably the most commonly used shot
Used for a sense of realism within the scene
The camera will be placed roughly five to six feet from the ground
We could apply this camera frame to scenes with lots of action, as the viewer will feel as though they are actually there and involved in the scene.
Low Angle Shot
These increase height (useful for short actors such as Tom Cruise) and give a sense of speeded motion
Low angles give a sense of confusion to a viewer, and induce feelings of powerlessness within the action of a scene
The background of a low angle shot will tend to be just sky or ceiling, which adds to the feeling of disorientation
We could use this camera angle to add height to our villain, to make him more fear-inducing. We could alternatively use this angle in a forest or outdoor setting, to make the trees/buildings seem more imposing and overpowering. This could be helpful to use in establishing shots
Oblique/canted angle
The camera is tilted (not placed horizontally to floor level) to suggest imbalance, transition and instability (popular in horror movies)
Indicates to the audience that the scene is unstable
We could apply this angle to a confrontation or scene to make the scene more ominous and unsettling. We could alternatively use this technique in combination with the use of a handheld camera to increase the feeling of uneasiness.
Camera Framing
Extreme Long Shot
Also referred to as an establishing shot
Can be taken from as far as a quarter of a mile away
Usually shows an exterior setting, for example a vast landscape or cityscape
In our horror film opening, we could start the sequence with an extreme long shot to establish the mood and setting of our piece. If we used this in combination with dark lighting (perhaps we could shoot in the evening) we could create an eerie effect.
Long Shot
The long shot is typically used to give an 'actual size' effect when the film is viewed in a cinema. This means it can be quite difficult to use.
The character on screen is fully shown, with their head near the top of the screen and their feet near to the bottom.
The background is still visible at the sides of the screen
This shot is a very simple shot we could use to show our character walking or moving from one place to the other. In a scene where facial expressions and mode of address are key to the narrative, we will not use this shot.
Medium Shot
Shows the character from the waist and upwards
These shots are typically used during dialogue scenes, because you can see the character's expression and mode of address
Very little setting is shown - the intention of this shot is to force the audience to concentrate mostly on the characters
If we use any medium shots in our sequence, we will priorly use a long shot to already establish the scene, to avoid any confusion surrounding the setting.
Over-the-Shoulder Shot
Similar to the medium shot, except the camera is placed behind the shoulder of the character in then foreground
Only the foreground character's head and shoulders are shown
The camera is typically focused on the front-facing speaking character, so the foreground character often appears blurred
If we use any dialogue scenes within our sequence, we could use over-the-shoulder shots to show the continuous dialogue between the two characters.
Close Up Shot
Concentrates on the face or another part of mise en scene
Can be used to add emphasis to a particular facial expression
Often the background will be blurred to add further emphasis to the item in shot, in a sense forcing the viewer to notice it
We could use this to show close ups of any stage makeup we do to emphasis its effect. We could also use a close up shot of any prominent mise en scene pieces, for example a letter.
Extreme Close Up Shot
The purpose of an extreme close up shot is to magnify beyond the naked eye
This adds a sense of uneasiness to the scene, as it is a very unfamiliar viewing angle
Used for dramatic effect
In our own film sequence, we could add an extreme close up shot of a characters eye or mouth to emphasise their facial expression and mode of address. It could potentially be quite powerful to include a range of extreme close up shots in a montage.
Camera Movements
Pans
Camera pans involve the camera scanning a setting horizontally
Can be used to keep a moving object in the middle of the frame
We could use this to scan our scene, or keep up with any moving characters
Tilts
Similar to a camera panning movement except it scans the scene vertically
We are unlikely to use this type of camera movement as it is typically used to show action that occurs across vast heights or depths. One opportunity to use this type of camera movement would include in our establishing shot - we could vertically scan the exterior of a tall building or forest.
Dolly Shot
The camera is placed on a moving vehicle of some sort to show a fast moving subject
The subject is able to be kept central in the frame
This is a difficult shot to execute, however with help we may be able to film a moving object or character.
Hand-Held Camera Shots
The camera is moved and held by the cameraman\
It rests on the shoulder for comfort and stability
This technique makes the audience feel as though they are part of the action, seeing through the eyes of a character.
One possible use of this camera technique in our film opening could include a character being chased. Someone could run after the person filming them, making it seem as though the viewer is watching through the eyes of the character. The jerky movements caused by the cameraman's footsteps would depict a sense of realism, adding uneasiness and terror.
Crane Shot
Similar to a dolly shot except the camera is able to move in all directions, including up and down
Used to ensure moving objects or characters are kept central in each shot
It is unlikely we will use this shot in our film opening as we won't have access to a crane. We may be able to create a makeshift crane using an extendable pole of some sort, however we will revisit this when planning our film opening.
Zoom Lens Shot
Used to magnify a shot, even with the camera operator standing one or two metres away
Used with a tripod and stabiliser
Used to zoom into a character's face
We could use a zoom lens to zoom into a character's face to emphasise their facial expression.
Steve Neale came up with the theory that 'genres are instances of repetition and difference', and 'difference is absolutely essential to the economy of genre'. He decided that the genre of a particular film is determined by two things:
How much it conforms with a genre's codes and conventions - he believed that a film must conform to its genre a substantial amount, in order to make it recognisably part of that genre
How much it subverts a genre's codes and conventions - he believed that a film must subvert these conventions enough to make it unique, yet must still be identifiable.
An example of a film that subverts stereotypical conventions of horror would include 'It Follows', directed by David Robert Mitchell. Mitchell interestingly uses teenage sexuality as a force of harm rather than as a characteristic used to foreshadow death. The plot includes a stalking terror that is sexually transmitted, twisting the classic stereotypes of the promiscuous teenager resulting as the victim. However, the film conforms to typical horror conventions in the sense that it uses dark setting and lighting, and has a young female as the final girl. The use of an abandoned house further contributes to conforming to the conventions of horror. Overall, I think the slight twist of genre in this film is used to make it more unique and memorable whilst keeping it easy to identify as part of the horror genre.
Vladimir Propp was a Russian film critic who was particularly interested in films based on folk tales. He was active mainly during the 20s and 30s, and eventually divised a book called 'Morphology of a Folk Tale' to showcase his theory.
Propp's Theory
Propp came up with a theory that consisted of seven different character types that are required to fill a story. These are:
the villain - an antagonist who creates grief for the hero
the hero - the character who resolves any wronghoods
the Princess - the woman desired by the hero
the false hero - the person who takes credit for the hero's actions
the donor - the character who gives the hero some kind of precious object
the dispatcher
the helper - a magical entity that assists the hero
According to his theory, the story should always feature conflict between the hero and the villain, and the villain is typically overcome (whether it be by physical or emotion means).
Character Research and Analysis of Ghostface from Scream (1996)
An iconic image of Ghostface (1996)
The Killer from the 1996 edition of Scream is shown wearing a black cloak, a white mask and carrying a bloodied knife. The mask itself has become an extremely popular icon of horror culture, as many reproductions of it have been made and sold to the public. It features regularly in fancy dress outfits and is instantly recognisable as Ghostface.
Whilst researching the origins of the Ghostface mask, I found out that the mask was actually not designed by the costume designers of the film - in fact, it was found in a abandoned house when the film crew were scouting for a film location to use. After they found the mask they decided to trace it back to its source, Fun World - a costume company, and after intense negotiation they established an agreement to use the mask in the film.
Interestingly, while the negotiations were taking place the film crew manufactured their own mask which was similar enough to be recognisable but different enough to avoid the breach of copyright. This mask is actually used in the first few scenes in the film, and as you can see if you look closely, there are a few visible differences. The eyes and facial features of the mask are slightly more pronounced at the start of the film, and become less prominent after the first few scenes.
Ghostface as he appears in the first scenes of the film
Costume Analysis
Clothing
Ghostface wears a very simple black cloak, with black gloves. This prominent use of the colour black conceals the killer's identity, as well as contributing to the character's dark, concealed nature. The use of a long, dark cloak is a theme 'borrowed' from Gothic literature and culture, for example 'The Ghost of Christmas Yet to Come' in A Christmas Carol by Charles Dickens.
The Mask
The mask is used for a number of reasons:
dehumanises the killer
removes the killer's identity, isolating him from the other characters
fear-inducing facial expression
the mask conceals the killer's hair, which again hides his identity as hair is often a personal feature that identifies everyone