Powered By Blogger
Showing posts with label Final Piece. Show all posts

Thursday, 27 April 2017

Final Piece- The Crypt

The Crypt


Shown below is our final piece. We were all very pleased with the final product and believed that we had achieved what we had planned to and more.


In terms of the process, we believe that our biggest struggle was creating a plot with smooth continuity that would make sense to the audience. It took us around four drafts to finalise our ideas and begin fully editing the opening. Another obstacle of ours, was the flashback. Primarily, we struggled to make the flashback look obvious to the audience without it seeming too exaggerated. So we played around with many effects and transitions to make sure we found the perfect one to portray our flashbacks. A final important obstacle of ours was music, we ended up having to layer multiple sounds to create our final piece, including low toned music, whispers, rain drops and tension building music. This is because our initial music was almost perfect, however, we all believed it didn't have enough tension or trepidation behind it, so we had to layer numerous sounds to create our desired effect.


Despite our obstacles however, we were very pleased with our improvements in our skills in Final Cut Pro and how the overall opening turned out! And we are looking forward to what we can learn, improve and create next!

-Caera Mendez


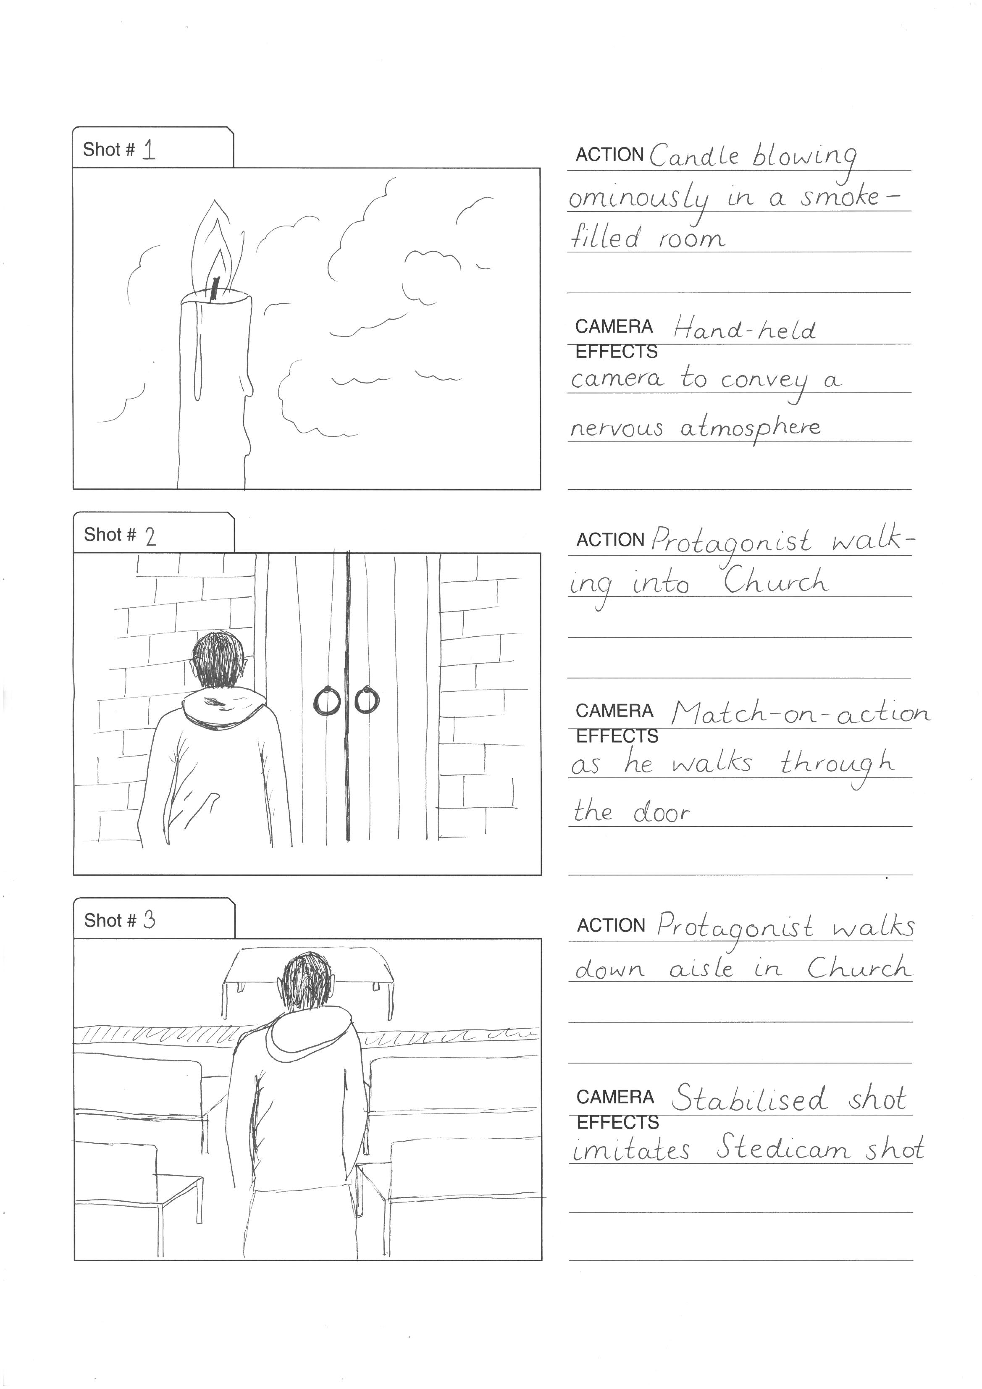
Storyboard

Storyboarding our Final Piece

Before starting our final film opening, we decided that we wanted to create a brief storyboard of our plot and camera framing.

I made a template using a computer and hand drew a series of images that we wanted to replicate in our film opening. I also listed the actions and camera techniques used alongside the drawings.


Wednesday, 26 April 2017

Film Title

Film Title 

After completing our film opening, we were left with an immensely difficult decision of what to name our sequence. After hours of deliberation, we formed a spider diagram containing a huge variety of possible options:

We analysed all of our suggestions and formed a list of the top 5. We then did a survey for people to vote between our top 4 which were:
-The Crypt
-Possessed
-The Martyr
-The Sacrifice 

https://www.surveymonkey.co.uk/r/L3NZVD6

We then gathered the results from out survey and discussed the outcome to help influence out decision:

From analysing our results, we could see that 'The Crypt' was the most popular option followed by ' Possessed'. We thought 'The Crypt' was very fitting as a 'Crypt' is an underground room underneath a church and since we included a lot of religious imagery in our sequence this name complements the theme perfectly. Additionally, there were several shots of our protagonist in an isolated underground location which could represent some sort of crypt too. Therefore we settled with this option and used this to name our opening sequence. 

Tuesday, 18 April 2017

Typography

Credits and Typography within our Film Opening

Due to our sequence being the opening scene of a film, we will need to include a set of opening credits

via GIPHY

The Credits

Before starting our typography, we made a draft list of all the credits. To find out an appropriate order for the credits we watched a few film openings to record how the credits are shown. The list runs as follows:
  • A Twisted Pictures Production
  • Directed by...
  • Produced by...
  • Edited by...
  • Screenplay by...
  • Casting by...
  • Costuming and Make Up by...
  • Director of Photography - 
  • Music by...

The Typography

We wanted to use typography that was clear, attractive and professional.

Eventually we settled on this style - it is simple and clear. We wanted to avoid cliche horror fonts with blood drops and special effects, as we wanted a more understated font to gently compliment the visuals on screen.


The Animation

We wanted our text to have a flickering effect. Initially, we did not know how to get such an effect, so we researched on the internet to see if there were any online applications to download animated text. After an unsuccessful search, we decided to create the font manually. To do this, we created multiple layers of the text and resized each one, flipping some of them upside-down or at an angle. Once we had created this multi-layered text we simply spliced each of them to be visible for only a short time (a fraction of a second). When viewed in normal speed, this gives the effect of flickering.
A still image of some of the rotated text.

Monday, 17 April 2017

Audience Feedback after our Final Piece

Consumer Feedback After Release of our Final Piece


How did we spread the word of our opening and promote it?

Due to this being a small project, we mainly targeted our film opening towards our friends and family - however this is justified due to the majority of our peers being teenagers and therefore members of our target audience.

To raise awareness of our video, all four of us shared the link on social media platforms such as Facebook, Twitter and WhatsApp. Doing this invited people to watch, like and comment on our video which made us realise the effect social media can have on the promotion of real media.

The Feedback

The audience feedback was mostly positive for the opening. As you can see we have got almost 430 views and we have got 34 likes and zero dislikes. There was also 14 comments.

Upon reading through the comment section on our video, we realised that people found our video suspenseful and scary, which is what we wanted. We also received positive feedback on our overall editing, highlighting parts such as the music, framing and sound effects.

Overall, we have come to conclusion that our film opening was a success, as many members of our target audience gave incredibly positive feedback. We also received verbal compliments from members of our school community as the link to our video was shared around.

Tuesday, 7 February 2017

Arrangement of our Film Opening

Problems with the Arrangement of our Film Opening

After filming the entirety of our footage, we began to edit our sequence following our storyboard. We  arranged the sequence starting with the cellar scenes, with the Church scenes featuring as flashbacks.

However, we began to notice that the narrative was unclear, as we struggled to highlight how the Church scenes are in fact merely visions. To solve this, we played around with moving the Church scenes to the very start of the sequence. This gave a completely different feel to the piece, yet didn't help much with the narrative clarity.

We then decided to try again with using the Church scenes as visions appearing later on in the sequence, using different techniques to clarify the nature of the scene. One method we used was using a blurring transition between scenes of reality and flashback. Although this increased the clarity, the transitions themselves looked unprofessional and amateur. We agreed on the fact that cleaner, simpler transitions are of a better aesthetic standard.

Finalising our arrangement is an ongoing process, and one which will require much thought from our team.

Tuesday, 31 January 2017

Final piece- Lighting

Lighting in our final piece:

The location of our final piece was in an underground cellar which provided us with no natural light. This worked to our advantage in a way as it meant we would not have to worry about the changes in light, which would occur throughout the day. However, this meant we had to use our creative initiative to provide our own lighting. 

We gained the majority of our lighting through candle light as this granted a natural, warm glow which made the location seem more realistic:


This was effective as the warmness of the candles produced an eerie atmosphere due to the shadows created which highlighted the authenticity of the walls and the cracks within them. However, this candle light was not powerful enough to light the whole room so we had to improvise. We did not own any professional lighting equipment therefore we resulted to the torch on our phone. However, we realised that this created a light which was too white and dissipated the warm tones we were aiming for. Therefore we covered the light with a piece of yellow paper to act as filter. This ended up working very effectively and lighted up the whole environment fully whilst giving it an eerie appearance. 

We also liked the fact that the lighting produced many shadows around the room giving it depth which ensures some areas are darkened making it compliment the genre perfectly.   


Saturday, 21 January 2017

Filming Schedule

Filming Schedule

Filming Day 2

We decided to create a filming schedule for the second day of filming in order to organise our time efficiently.

We had obtained satisfactory footage of all shots including the makeup special effects which left us with the other half of footage to complete, this being the religious montage we wanted to create. We decided that the best location for this would be within a church setting as this is epitome of religious mise en scene.

The day we have chose to film the second part of our footage is 25/01/17. Here, we aim to form several shots of religious objects such as stained glass windows and statues. We will form a variety of camera movements and try and include some camera techniques such as match on action. 

The filming schedule for 25/01/17 :
1630: Meet at location (church)
1645: Set up camera equipment  
1700: Filming inside of the church
1800: Review shots on the camera
1815: Continue filming or re-filming shots
1845: Move to the outside of the church
1900: Filming the outside of the church 
1920: Review the outside shots
1935: Continue filming/re-filming
1950: Pack equipment away
2000: Finish 

We have finished at 8 therefore if any misfortunes are to occur we are prepared to spend time after 8o clock  to film if it is necessary.